今回は Let’s Encrypt のワイルドカード証明書 ( Wildcard Certificate ) を Certbot ツールを使って DNS-01 方式で取得し、Web サーバへ適用します。Cloudflare ( クラウドフレア ) や DNS-RFC2136 プラグインなどを使わず、証明書の更新を 90日 ごとに手動で行う方法です。
気になるので基本的なところから見ていきます。
Let’s Encrypt(レッツ・エンクリプト)とは
Let’s Encrypt(レッツ・エンクリプト)は、2016年4月に正式に開始された認証局で、自動化された発行プロセスにより、TLS の X.509 証明書の発行を無料で行っています。
ACME v2 とワイルドカード証明書のサポートが2018年3月から開始されています。
出典:Let’s Encrypt – ウィキペディア
また、
アメリカのISRG(Internet Security Research Group)が運営する無料 SSL 証明書の署名と発行する機関であり、Cisco、OVH、Mozilla、Google Chrome、Electronic Frontier Foundation、Internet Society、facebookなどの有名企業が支援する非営利団体です。
詳細:スポンサー
発行される証明書の有効期間は 90日 ですが、スクリプトの設定を介して自動的に更新できるので、半永久的に維持可能な証明書です。
Let’s Encryptの発表によると、2019年にルート証明書は、1億2千万個以上、FQDN は2億1500万個以上まで成長すると分析しています。その内容を見ると、SSL 証明書の適用が驚異的な速度で増加していることわかります。
詳細:Looking Forward to 2019
ワイルドカードの取得のための ACME ドメイン検証方式
ACME ( Automated Certificate Management Environment ) は Let’s Encrypt が採用しているドメインを検証するプロトコルで、該当ドメインを所有しているかをチェックして所有者のみにワイルドカード証明書を発行するための仕組みです。
よく利用する検証方式は2つです。ここでは DNS-01 を利用します。
サーバ環境 ( CentOS 7.6 / Apache 2.4.39 / BIND 9.9.4)
[root@centos7 ~]# cat /etc/redhat-release
CentOS Linux release 7.6.1810 (Core)

[root@centos7 ~]# /usr/local/apache2/bin/httpd -v
Server version: Apache/2.4.39 (Unix) Server built:   May 26 2019 16:03:35

[root@centos7 ~]# named -v
BIND 9.9.4-RedHat-9.9.4-74.el7_6.1 (Extended Support Version)
ここから設定していきます。
Certbot インストール
Apache / CentOS/RHEL7 の環境ではない方は、
Certbot 公式ホームへアクセスしてご自身の環境に合わせて software と system を選んでください。選択後、表示される画面の指示に従ってインストール・設定してください。コマンドが異なる可能性があります。
Certbot をインストールします。
Certbot は EPEL ( Enterprise Linux 用の追加パッケージ ) にパッケージされています。Certbot を使用するには、EPEL リポジトリを有効にする必要があります。RHEL または Oracle Linux は、オプションチャンネルを有効にする必要があります。
[root@ centos7〜]# yum install epel-release
[root@ centos7〜]# yum install certbot python2-certbot-apache
...
Installed:
certbot.noarch0:0.31.0-2.el7python2-certbot-apache.noarch0:0.31.0-1.el7
...
Certbot バージョンを確認します。
[root@centos7 ~]# certbot --version
certbot 0.31.0
DNS-01 方式でワイルド証明書を発行
Let’s Encrypt が 認証用の DNS TXT レコードを照会し、一致する項目があれば、証明書を発行してくれます。
- 1ワイルド証明書の発行申請
[root@centos7 ~]# certbot certonly --manual --preferred-challenges dns-01 -d *.example.com -d example.com -m your-email-account@your-domain.com --agree-tos --manual-public-ip-logging-ok --server https://acme-v02.api.letsencrypt.org/directory
Saving debug log to /var/log/letsencrypt/letsencrypt.log
Plugins selected: Authenticator manual, Installer None
Starting new HTTPS connection (1): acme-v02.api.letsencrypt.org
Obtaining a new certificate
Performing the following challenges:
dns-01 challenge for example.com

- - - - - - - - - - - - - - - - - - - - - - - - - - - - - - - - - - - - - - - -
Please deploy a DNS TXT record under the name
_acme-challenge.example.com with the following value:

9EDkmlyOBgiwfYCO2yTN6tSBN_Heh_c5FjVN6CSaOiU  ◀︎ 環境によって異なります。

Before continuing, verify the record is deployed.
- - - - - - - - - - - - - - - - - - - - - - - - - - - - - - - - - - - - - - - -
Press Enter to Continue  ◀︎ ここで、照会待機!
Press Enter to Continue のところでエンタキーを押さず、別のコマンドライン・ウィンドウを開いて Let’s Encrypt が照会する項目を作ります。
- 2照会する項目を作成
_acme-challenge.example.com. IN TXT "9EDkmlyOBgiwfYCO2yTN6tSBN_Heh_c5FjVN6CSaOiU"
TIPS最後に点をつける:_acme-challenge.example.com.
“”で囲む:“9EDkmlyOBgiwfYCO2yTN6tSBN_Heh_c5FjVN6CSaOiU“ - 3DNS システムへ反映
example.com のゾーンデータベースファイルの最後に追加して BIND デーモンを再起動します。
[root@centos7 named]# vi example.com.db.wan

_acme-challenge.example.com.    IN  TXT "9EDkmlyOBgiwfYCO2yTN6tSBN_Heh_c5FjVN6CSaOiU"
BIND デーモン ( named また、named-chroot ) を再起動します。
[root@centos7 named]# systemctl restart named
- 4DNS TXT レコード確認
2つのコマンドから確認できます。
環境によって反映まで掛かる時間は異なります。少し時間がたってから確認して見てください。
未反映の場合:
try????everything ~$ dig  _acme-challenge.example.com txt +short    # Answerのみ出力
<何も出てきません>

try????everything ~$ nslookup -type=TXT _acme-challenge.example.com 8.8.8.8
Server:        8.8.8.8
Address:    8.8.8.8#53

Non-authoritative answer:
*** Can't find _acme-challenge.example.com: No answer

try????everything ~$
反映済みの場合:
try????everything ~$ dig  _acme-challenge.example.com txt +short    # Answerのみ出力
"9EDkmlyOBgiwfYCO2yTN6tSBN_Heh_c5FjVN6CSaOiU"

try????everything ~$ nslookup -type=TXT _acme-challenge.example.com 8.8.8.8
Server:        8.8.8.8
Address:    8.8.8.8#53

Non-authoritative answer:
_acme-challenge.example.com    text = "9EDkmlyOBgiwfYCO2yTN6tSBN_Heh_c5FjVN6CSaOiU"

Authoritative answers can be found from:

try????everything ~$
- 5照会してもらう
DNS TXT レコードの追加が反映されたら、
Press Enter to Continue で照会待機されているコマンドライン・ウィンドウへ戻り、エンタキーを押してください。
下記のように2019-09-09日 ( 90日 ) まで有効なワイルドカード証明書が発行されます。Waiting for verification... Cleaning up challenges Resetting dropped connection: acme-v02.api.letsencrypt.org IMPORTANT NOTES: - Congratulations! Your certificate and chain have been saved at: /etc/letsencrypt/live/example.com/fullchain.pem Your key file has been saved at: /etc/letsencrypt/live/example.com/privkey.pem Your cert will expire on 2019-09-09. To obtain a new or tweaked version of this certificate in the future, simply run certbot again. To non-interactively renew *all* of your certificates, run "certbot renew" - If you like Certbot, please consider supporting our work by: Donating to ISRG / Let's Encrypt: https://letsencrypt.org/donate Donating to EFF: https://eff.org/donate-le [root@centos7 ~]
- 6発行!
発行ずみの証明書は /etc/letsencrypt/live/ドメイン名 に保存されますので確認して見ます。
[root@centos7 ~]# ll    /etc/letsencrypt/live/example.com/
total 4
lrwxrwxrwx 1 root root  36 Jun 12 01:02 cert.pem -> ../../archive/example.com/cert1.pem
lrwxrwxrwx 1 root root  37 Jun 12 01:02 chain.pem -> ../../archive/example.com/chain1.pem
lrwxrwxrwx 1 root root  41 Jun 12 01:02 fullchain.pem -> ../../archive/example.com/fullchain1.pem
lrwxrwxrwx 1 root root  39 Jun 12 01:02 privkey.pem -> ../../archive/example.com/privkey1.pem
-rw-r--r-- 1 root root 692 Jun 12 01:02 README

[root@centos7 ~]
ワイルドカード証明書として正常に動作するかチェック
HTTPS の設定方法 は こちら をご参照ください。
Apache の SSL 設定ファイルに新しい証明書を指定して HTTPD デーモンを再起動します。
[root@centos7 conf]# vi /usr/local/apache2/conf/extra/httpd-ssl.conf
    #SSLCertificateFile /etc/pki/tls/certs/server.crt
    #SSLCertificateKeyFile /etc/pki/tls/private/server.key

    ↓↓↓↓ 変更

    #Let's encrypt(wildcard)
    SSLCertificateFile /etc/letsencrypt/live/example.com/cert.pem
    SSLCertificateKeyFile /etc/letsencrypt/live/example.com/privkey.pem
    Include /etc/letsencrypt/options-ssl-apache.conf
    SSLCertificateChainFile /etc/letsencrypt/live/example.com/chain.pem

[root@centos7 conf]# systemctl restart httpd2.service
ウェブサイトに適用されている SSL 証明書を確認
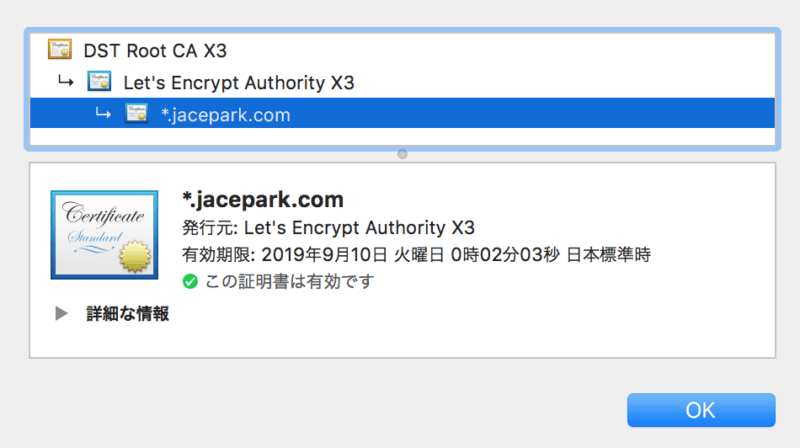
Chrome デベロッパーツールによる確認方法
発行元と*.<ドメイン> になっているのを確認します。
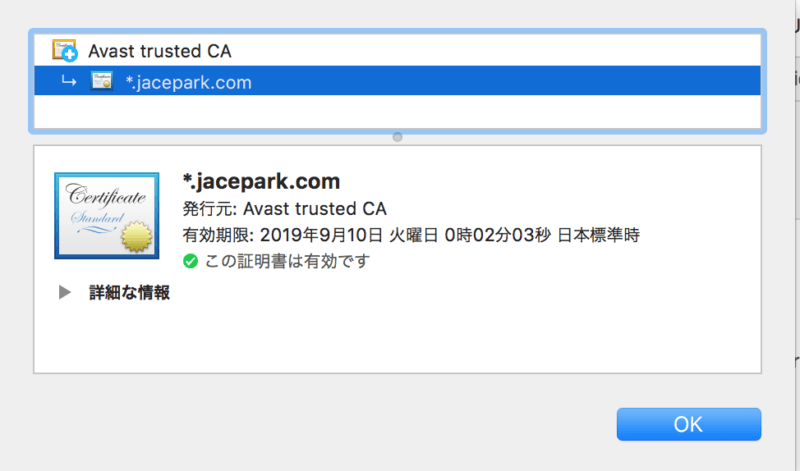
SSL証明書の発行元が Avast trusted CA になる場合 : 上記の左図
Avast をインストールしていると起こる問題のようです。
対応:
発行元が Let’s Encrypt Authority X3 になっている ( 上記の右図 ) とOKです。( 2019/06/12日 現在 )
コマンドラインで確認する方法
O = Let’s Encrypt, CN = Let’s Encrypt Authority X3 のように組織 ( O ) と通称 ( CN ) を確認してください。
[root@centos7 ~]# openssl s_client -connect www.example.com:443 -showcerts
CONNECTED(00000003)
depth=1 C = US, O = Let's Encrypt, CN = Let's Encrypt Authority X3
verify error:num=20:unable to get local issuer certificate
verify return:1
depth=0 CN = *.example.com
verify return:1
...
SSL Server Test
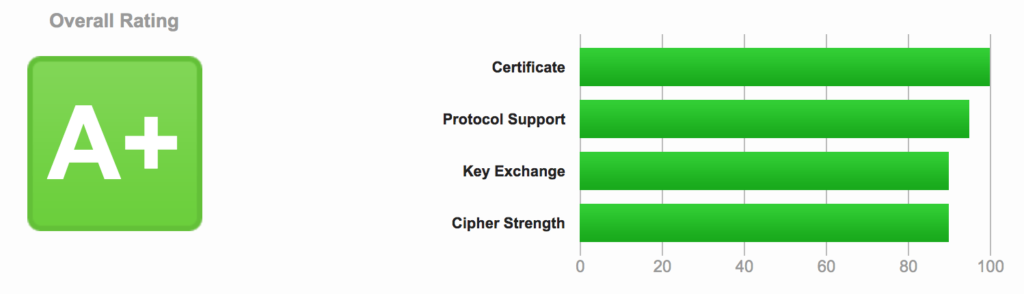
ネット上の SSL Web サーバーの構成の詳細な分析を実行する無料のオンラインサービスを利用してテストを行うことができます。よければやって見てください。
https://www.ssllabs.com/ssltest/index.html
↑このサイトにアクセスしてテストしたい Hostname を入力し、Submit をクリックします。少し時間がかかります。
Certificate、Protocol Support、Key Exchange、Cipher Strength の4つの項目のスコアがわかります。
画面をスクロールしてみると、非常に詳細な情報が表示されますので、よければその内容を参考にして設定を補強して A+ の評価に挑戦してみるのも良いかもしれません。
証明書の手動更新
DNS-01 方式でワイルド証明書を発行 の手順を行い、更新します。
コメント