
主なリソース・動作環境
- React-Native with managed Expo env.
- Redux Toolkit –
createSlice、configureStore、Redux-thunk - React Hooks –
useReducer( React v.16.8 ↑) - React Redux Hooks –
useSelector(),useDispatch()( React Redux v7.1.0↑) - React Native Paper
以下の環境で構成しています。
- macOS Catalina 10.15.3
- expo 36.0.0
- @reduxjs/toolkit 1.2.5
- react-redux 7.2.0
- redux 4.0.5
- axios 0.19.2
- react-native-paper 3.6.0
この記事で分かること
- Redux を実装する一般的な手順
- Redux を実装する方法
- 一般的 Redux 実装方法及び使い方から、Redux Toolkit で Redux の実装を簡略化する方法 & 移行方法
- 関数コンポーネント ( フック )、クラスコンポーネント ( HOC ) への設定の違い
useReduceruseSelectoruseDispatchcreateSliceなどの簡単な使い方- Redux Toolkit 上での非同期処理方法、例 ( Counter、EmployeeList 閲覧 )
- 一つのアプリの中には一つの
Storeを作成します。( 推奨 ) Stateは読み取り専用です。- 配列に
pushを直接せず、concatのような関数を使用したり、 - オブジェクトに
Object.assignやスプレッド構文(...) を使用してStateを更新します。
- 配列に
Reducer 関数は純粋関数 ( Pure Functions ) である必要があります。- 同じ引数で呼び出された Reducer 関数は常に同じ戻り値を返す必要があります。( Pure )
- 以下は純粋関数ではありません ( Impure functions ):
- new Date()、 Math.random()、axios.get(someUrl) など戻り値が変わるもの。( Middleware で処理 )
Redux の実装方法のまとめ
RTK を使用することで Constants 作成 段階を省略、Actions と Redux Slice 作成 段階を まとめて Redux Slice で作成出来、一つに統合することが出来ます。
複雑な設定方法がシンプルになり、関数コンポーネントで useReducer、useSelecter、useDispatchなどのフックを使用するとコードは更にシンプルに作成できると思います。
| React Native に Redux を実装する方法 | Basic | Redux Toolkit ( RTK ) | RTK + React Hook | RTK + Redux Hooks | RTK + Redux Hooks Thunk w/ Counter | RTK + Redux Hooks Thunk w/ EmployeeList |
| 初期セットアップ | ● | ← | ← | ← | ← | ← |
| Constants 作成 | ● | X | X | X | X | X |
| Actions 作成 | ● | X | X | X | X | X |
| Reducer function 作成 | ● | X | X | X | X | X |
| Redux Slice 作成 | X | ● | ● | ● | ● | ● |
| Redux Store 作成 | ● | ● | ● | ● | ● | ● |
| Redux Store を React Native アプリ ( Root ) へパスする | ● | ● | ● | ● | ● | ● |
| React Native アプリを Redux Store へコネクトする | ● | ● | ● | ● | ● | ● |
▲ 縦軸:Redux を実装する一般的な手順、横軸:Redux を実装する方法 ( 個人的見解 )
これから ▲ の表をもとに + ー ボタンを押してカウントを変える「カウンター」を作成します。Expo 環境は整っていると想定します。
方法 #1:Basic
- Step 1初期セットアップ
Expo プロジェクトを作成
expo init redux-toolkit-practiceを実行し Expo プロジェクトを作成します。try🐶everything ~$ expo init redux-toolkit-practice ? Choose a template: expo-template-blank Using Yarn to install packages. You can pass --npm to use npm instead. Extracting project files... ..
Redux パッケージをインストールします。
別のターミナルを開いてから
npm install ...を実行します。( macOS環境 )try🐶everything redux-toolkit-practice$ yarn add react-redux try🐶everything redux-toolkit-practice$ yarn add redux // react-native-paper は必須ではありません。 try🐶everything redux-toolkit-practice$ yarn add react-native-paper
※
react-reduxはreduxをコンポーネント上で、より簡単に使用するためのライブラリで、コンポーネントのStoreをpropsで受け取ったり、Subscribeを自分で行う必要がありません。インストールが完了したら、
expo startで Expo サーバを起動 & iOS シミュレータを起動しておきます。( Android エミュレータでも OK )try🐶everything ~$ cd redux-toolkit-practice/ try🐶everything redux-toolkit-practice$ expo start ... Couldn't start project. Please fix the errors and restart the project. ↑ようなエラーが発生すると、↓を実行してください。 try🐶everything redux-toolkit-practice$ npm install
iOS シミュレータ画面に
Open up App.js to start working on your app!と表示されたことを確認します。必要なフォルダーを作成します。
try🐶everything redux-toolkit-practice$ mkdir src
try🐶everything redux-toolkit-practice$ mkdir src/actions
try🐶everything redux-toolkit-practice$ mkdir src/constants
try🐶everything redux-toolkit-practice$ mkdir src/reducers
try🐶everything redux-toolkit-practice$ mkdir src/components
try🐶everything redux-toolkit-practice$ mkdir src/store
- Step 2Constants 作成
この時点でアプリの UI は確定して置きます。
(+ーボタンを押して数字の変化を確認する「カウンターアプリ」を作成 )src/constants/index.js
export const COUNTER_CHANGE = "COUNTER_CHANGE";
- Step 3Actions 作成
Action オブジェクトを返す関数 ( Action Creators ) を作成します。
src/actions/counts.js
import { COUNTER_CHANGE } from "../constants"; export function changeCount(count) { return { type: COUNTER_CHANGE, payload: count }; } - Step 4Reducer 関数作成
Reducer 関数は現在の
stateとactionを引数として取り「新しい State」を返します。Action タイプがCOUNTER_CHNAGEの場合、countにaciton.payloadをセットして返します。src/reducers/countReducer.js
import { COUNTER_CHANGE } from "../constants"; const initialState = { count: 0 }; const countReducer = (state = initialState, action) => { switch (action.type) { case COUNTER_CHANGE: return { ...state, count: action.payload }; default: return state; } }; export default countReducer; - Step 5Redux Store 作成
src/store/index.js
import { createStore, combineReducers } from "redux"; import countReducer from "../reducers/countReducer"; const rootReducer = combineReducers({ count: countReducer }); const configureStore = () => { return createStore(rootReducer); }; export default configureStore; - Step 6React Native アプリを Redux Store へコネクトする
実装:クラスコンポーネント
mapStateToPropsmapDispatchToPropsbindActionCreatorsconnectconnect()関数を使用してCounterBasicクラスコンポーネントをRedux Store へ繋ぎます。ここで、Action を実行する関数 (
decrementCount()、incrementCount()) を作成し、ボタンをタップするたびにState直に反映させます。- React Native アプリ = CounterBasic
src/components/CounterBasic.js
import React, { Component } from "react"; import { View, Button, Text } from "react-native"; import { connect } from "react-redux"; import { bindActionCreators } from "redux"; import * as countActions from "../actions/counts"; class CounterBasic extends Component { decrementCount() { let { count, actions } = this.props; count--; actions.changeCount(count); } incrementCount() { let { count, actions } = this.props; count++; actions.changeCount(count); } render() { const { count } = this.props; return ( <View> <Button title="+ CounterBasic" onPress={() => this.incrementCount()} /> <Text style={{ textAlign: "center" }}>Count: {count}</Text> <Button title="- CounterBasic" onPress={() => this.decrementCount()} /> </View> ); } } const mapStateToProps = state => ({ count: state.count.count }); const ActionCreators = Object.assign({}, countActions); const mapDispatchToProps = dispatch => ({ actions: bindActionCreators(ActionCreators, dispatch) }); export default connect(mapStateToProps, mapDispatchToProps)(CounterBasic); - Step 7Redux Store を React Native アプリ ( Root ) へパスする
実装:
configureStore<Provider store={sore}> ... </Provider>先ほどの
CounterBasicクラスコンポーネントを表示させながら、react-reduxのProviderを使用して Root アプリを Redux Store へ繋ぎます。App.js
import { SafeAreaView, View, Text } from "react-native"; import React from "react"; import { Provider } from "react-redux"; import { Divider, Colors } from "react-native-paper"; import CounterBasic from "./src/components/CounterBasic"; import configureStore from "./src/store"; const store = configureStore(); const MyDivider = () => <Divider style={{ backgroundColor: Colors.red900 }} />; export default function() { return ( <SafeAreaView style={{ flex: 1, alignItems: "center", justifyContent: "center" }} > <Provider store={store}> <View> <MyDivider /> <CounterBasic /> <MyDivider /> </View> </Provider> </SafeAreaView> ); } - Step 8App Test

▲ iOS シミュレータ 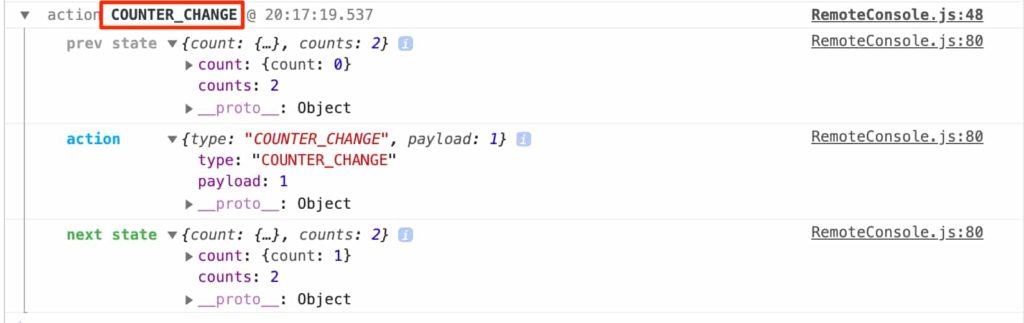
▲ redux-logger
方法 #2:Redux Toolkit ( RTK )
Redux Toolkit ( 旧 redux-starter-kit ) を導入して「方法 #1」から Constants作成 を行わず、+ Actions と Reducer 関数 を一つにまとめることで一層シンプルさがアップします。
- Step 1初期セットアップ
「方法 #1」
+以下の@redux-toolkitをインストールします。try🐶everything redux-toolkit-practice$ yarn add @reduxjs/toolkit info Direct dependencies └─ @reduxjs/toolkit@1.2.5 info All dependencies ├─ @reduxjs/toolkit@1.2.5 ├─ immer@4.0.2 ├─ json-stringify-safe@5.0.1 ├─ redux-devtools-extension@2.13.8 ├─ redux-immutable-state-invariant@2.1.0 ├─ redux-thunk@2.3.0 └─ reselect@4.0.0 ✨ Done in 8.99s.
同時に
immerjson-stringify-safeedux-devtools-extensionredux-immutable-state-invariantredux-thunkreselectパッケージもインストールされます。src/modulesフォルダーを作成しておきます。try🐶everything redux-toolkit-practice$ mkdir src/modules
- Step 2Actions & Reducer 関数作成
Constants 作成は不要です!Reducer 関数を作成する際、Switch 文は不要です。
RTK の createSlice を使用します。
src/modules/countsSlice.js
import { createSlice } from "@reduxjs/toolkit"; const countsSlice = createSlice({ name: "counter", initialState: 0, reducers: { increment: state => state + 1, decrement: state => state - 1 } }); export const { increment, decrement } = countsSlice.actions; export default countsSlice.reducer; - Step 3Redux Store 作成
RTK の configureStore を利用します。
src/store/index.js
「方法 #1」
+以下のように Slice 設定を追加します。import { combineReducers } from "redux"; import { configureStore } from "@reduxjs/toolkit"; import countReducer from "../reducers/countReducer"; import countsReducer from "../modules/countsSlice"; const rootReducer = combineReducers({ count: countReducer, counts: countsReducer }); const store = configureStore({ reducer: rootReducer }); export default store; - Step 4React Native アプリを Redux Store へコネクトする
実装:クラスコンポーネント
createSlicemapStateToPropsmapDispatchToPropsconnect()src/modules/CounterRTKwithSliceConnect.js
import React, { Component } from "react"; import { View, Button, Text } from "react-native"; import { connect } from "react-redux"; import { increment, decrement } from "../modules/countsSlice"; class CounterRTKwithSliceConnect extends Component { render() { const { counts } = this.props; console.log("!@# this.props: ", this.props); return ( <View> <Button title="+ RTKwithSliceConnect" onPress={() => this.props.increment()} /> <Text style={{ textAlign: "center" }}>Count: {counts}</Text> <Button title="- RTKwithSliceConnect" onPress={() => this.props.decrement()} /> </View> ); } } const mapStateToProps = state => ({ counts: state.counts }); const mapDispatchToProps = { increment, decrement }; export default connect( mapStateToProps, mapDispatchToProps )(CounterRTKwithSliceConnect); - Step 5Redux Store を React Native アプリ ( Root ) へパスする
実装:
configureStorestore<Provider store={sore}> ... </Provider>「方法 #1」の
Step 7でStoreにパス済!CounterRTKwithSliceConnectコンポーネントを表示させます。App.js
import { SafeAreaView, View, Text } from "react-native"; import React from "react"; import { Provider } from "react-redux"; import { Divider, Colors } from "react-native-paper"; import CounterBasic from "./src/components/CounterBasic"; import CounterRTKwithSliceConnect from "./src/modules/CounterRTKwithSliceConnect"; import store from "./src/store"; const MyDivider = () => <Divider style={{ backgroundColor: Colors.red900 }} />; export default function() { return ( <SafeAreaView style={{ flex: 1, alignItems: "center", justifyContent: "center" }} > <Provider store={store}> <View> <MyDivider /> <CounterBasic /> <MyDivider /> <CounterRTKwithSliceConnect /> <MyDivider /> </View> </Provider> </SafeAreaView> ); } - Step 6App Test
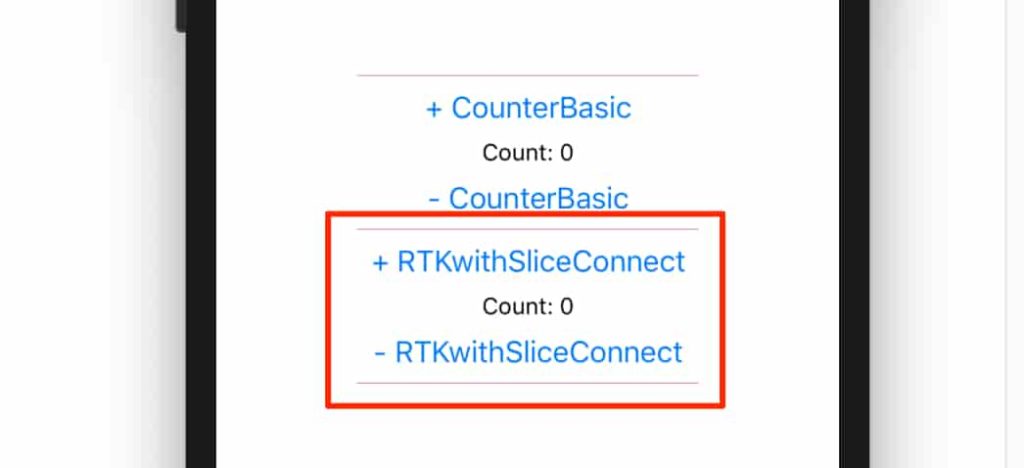
▲ iOS シミュレータ 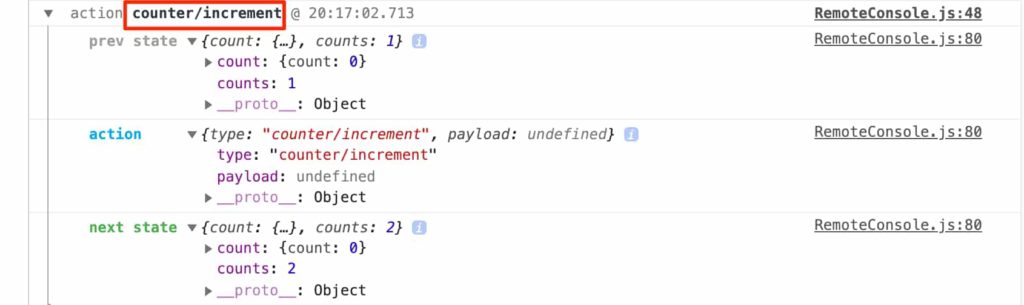
▲ redux-logger
方法 #3:RTK + React Hook
useReducer() は Redux Store へ登録されている特定の State 直を取得し dispatch する方法を提供してくれます。
実装するには「方法 #2」の Step 4 と Step 5 だけを以下のように変更します。
- Step 1React Native アプリを Redux Store へコネクトする
実装:関数コンポーネント
createSliceuseReducersrc/modules/CounterRTKwithSliceReactHook.js
import React, { useReducer } from "react"; import { Text, View, Button } from "react-native"; import reducer, { increment, decrement } from "../modules/countsSlice"; const initialState = 0; export default function CounterRTKwithSliceReactHook() { const [counts, dispatch] = useReducer(reducer, initialState); return ( <View> <Button title="+ RTKwithSliceReactHook" onPress={() => dispatch(increment)} /> <Text style={{ textAlign: "center" }}>Count: {counts}</Text> <Button title="- RTKwithSliceReactHook" onPress={() => dispatch(decrement)} /> </View> ); } - Step 2Redux Store を React Native アプリ ( Root ) へパスする
実装:
configureStorestore<Provider store={sore}> ... </Provider>「方法 #1」の
Step 7でStoreにパス済!CounterRTKwithSliceReactHookコンポーネントを表示させます。App.js
import { SafeAreaView, View, Text } from "react-native"; import React from "react"; import { Provider } from "react-redux"; import { Divider, Colors } from "react-native-paper"; import CounterBasic from "./src/components/CounterBasic"; import CounterRTKwithSliceConnect from "./src/modules/CounterRTKwithSliceConnect"; import CounterRTKwithSliceReactHook from "./src/modules/CounterRTKwithSliceReactHook"; import store from "./src/store"; const MyDivider = () => <Divider style={{ backgroundColor: Colors.red900 }} />; export default function() { return ( <SafeAreaView style={{ flex: 1, alignItems: "center", justifyContent: "center" }} > <Provider store={store}> <View> <MyDivider /> <CounterBasic /> <MyDivider /> <CounterRTKwithSliceConnect /> <MyDivider /> <CounterRTKwithSliceReactHook /> <MyDivider /> </View> </Provider> </SafeAreaView> ); } - Step 3App Test
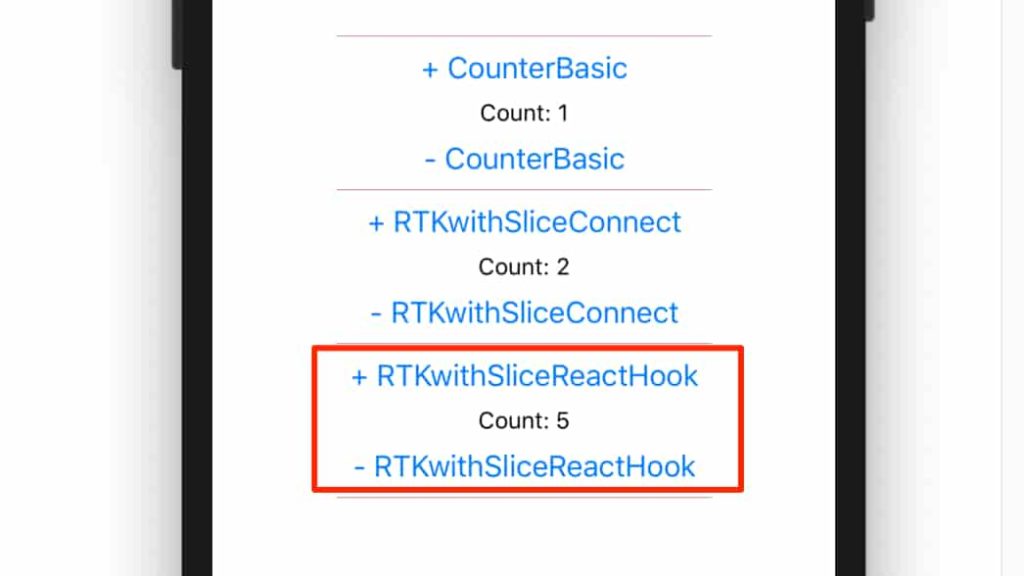
▲ iOS シミュレータ useReducerは Redux Store を利用しないためredux-loggerにはロギングされません。
方法 #4:RTK + Redux Hooks
今回は React フック ( useReducer ) ではなく react-redux フックの useSelector useDispatch を利用します。
実装するには「方法 #2」の Step 4 と Step 5 だけを以下のように変更します。
- Step 1React Native アプリを Redux Store へコネクトする
実装:関数コンポーネント
useSelectoruseDispatchcreateSlicesrc/modules/CounterRTKwithSliceReduxHooks.js
import React from "react"; import { View, Button, Text } from "react-native"; import { increment, decrement } from "../modules/countsSlice"; import { useSelector, useDispatch } from "react-redux"; export default function CounterRTKwithSliceReduxHooks() { const counts = useSelector(state => state.counts); const dispatch = useDispatch(); return ( <View> <Button title="+ RTKwithSliceReduxHooks" onPress={() => dispatch(increment())} /> <Text style={{ textAlign: "center" }}>Count: {counts}</Text> <Button title="- RTKwithSliceReduxHooks" onPress={() => dispatch(decrement())} /> </View> ); } - Step 2Redux Store を React Native アプリ ( Root ) へパスする
実装:
configureStorestore<Provider store={sore}> ... </Provider>「方法 #1」の
Step 7でStoreにパス済!CounterRTKwithSliceReduxHooksコンポーネントを表示させます。App.js
import { SafeAreaView, View, Text } from "react-native"; import React from "react"; import { Provider } from "react-redux"; import { Divider, Colors } from "react-native-paper"; import CounterBasic from "./src/components/CounterBasic"; import CounterRTKwithSliceConnect from "./src/modules/CounterRTKwithSliceConnect"; import CounterRTKwithSliceReactHook from "./src/modules/CounterRTKwithSliceReactHook"; import CounterRTKwithSliceReduxHooks from "./src/modules/CounterRTKwithSliceReduxHooks"; import store from "./src/store"; const MyDivider = () => <Divider style={{ backgroundColor: Colors.red900 }} />; export default function() { return ( <SafeAreaView style={{ flex: 1, alignItems: "center", justifyContent: "center" }} > <Provider store={store}> <View> <MyDivider /> <CounterBasic /> <MyDivider /> <CounterRTKwithSliceConnect /> <Text style={{ textAlign: "center", fontSize: 20 }}>Or</Text> <CounterRTKwithSliceReduxHooks /> <MyDivider /> <CounterRTKwithSliceReactHook /> <MyDivider /> </View> </Provider> </SafeAreaView> ); } - Step 3App Test
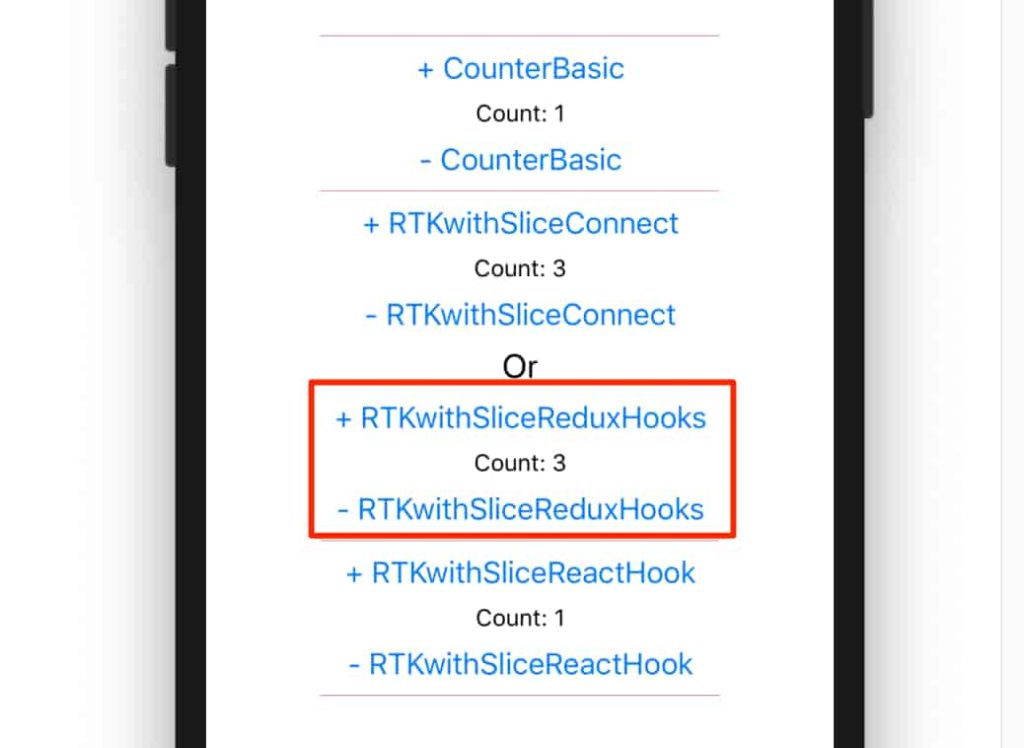
▲ iOS シミュレータ 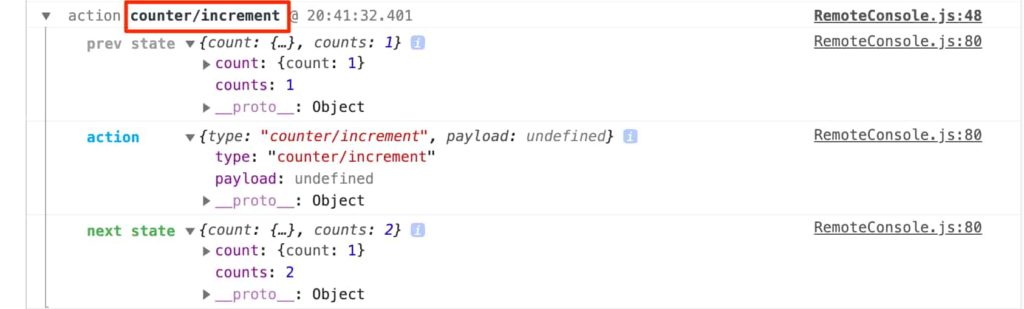
▲ redux-logger
方法 #5:RTK + Redux Hooks + Thunk w/ Counter
Redux Thunk のような Middleware の必要性は Redux 固有の動作方法から生まれます。
Action オブジェクトは Store の唯一の情報源です。Action CreatorはAction オブジェクトだけを返します。ReducerはAction オブジェクトを同期処理として Store に Dispatch します。
この場合、特定のアクションを数秒後に実行させたり、ネットワークリクエストなどのSide Effects には、普通の Action Creators ではできません。
これらを可能にするには、Dispatch される Action と Reducer に到達する Action の間に Middleware を配置することです。
Redux Thunk は、Action オブジェクト の代わりに関数を返す Action Creators を呼び出すことで特定のアクションを遅延させたり、ネットワークリクエストを Store に Dispatch することができます。( パラメーターとして Store メソッドの dispatch と getState を受け取ります。)
それでは、RTK にデフォルトで含まれている redux-thunk を利用して非同期処理を行います。
- Step 1Redux Store に Middlewareとして thunkを追加する
既存のファイルに
import thunk from "redux-thunk";middleware: [thunk]
を追加します。src/store/index.js
import { combineReducers } from "redux"; import { configureStore } from "@reduxjs/toolkit"; import thunk from "redux-thunk"; import countReducer from "../reducers/countReducer"; import countsReducer from "../modules/countsSlice"; const rootReducer = combineReducers({ count: countReducer, counts: countsReducer }); const store = configureStore({ reducer: rootReducer, middleware: [thunk] }); export default store; - Step 2非同期処理をする関数コンポーネントを作成する
非同期
Dispatchを実行する関数を返すAction Creatorを作成 ( 書き方の詳細 ) して React Native アプリを Redux Store へコネクトします。src/modules/RTKwithSliceReduxHooksThunkAsync.js
import React from "react"; import { View, Button, Text } from "react-native"; import { increment, decrement } from "../modules/countsSlice"; import { useSelector, useDispatch } from "react-redux"; const incrementAsync = () => dispatch => { setTimeout(() => { dispatch(increment()); }, 1000); }; const decrementAsync = () => dispatch => { setTimeout(() => { dispatch(decrement()); }, 1000); }; export default function RTKwithSliceReduxHooksThunkAsync() { const counts = useSelector(state => state.counts); const dispatch = useDispatch(); return ( <View> <Button title="+ RTKwithSliceReduxHooksThunkAsync" onPress={() => dispatch(incrementAsync())} /> <Text style={{ textAlign: "center" }}>Count: {counts}</Text> <Button title="- RTKwithSliceReduxHooksThunkAsync" onPress={() => dispatch(decrementAsync())} /> </View> ); } - Step 3Redux Store を React Native アプリ ( Root ) へパスする
実装:
configureStorestore<Provider store={sore}> ... </Provider>「方法 #1」の
Step 7でStoreにパス済!RTKwithSliceReduxHooksThunkAsyncコンポーネントを表示させます。App.js
import { SafeAreaView, View, Text, StyleSheet } from "react-native"; import React from "react"; import { Provider } from "react-redux"; import { Divider, Colors } from "react-native-paper"; import CounterBasic from "./src/components/CounterBasic"; import CounterRTKwithSliceConnect from "./src/modules/CounterRTKwithSliceConnect"; import CounterRTKwithSliceReactHook from "./src/modules/CounterRTKwithSliceReactHook"; import CounterRTKwithSliceReduxHooks from "./src/modules/CounterRTKwithSliceReduxHooks"; import RTKwithSliceReduxHooksThunkAsync from "./src/modules/RTKwithSliceReduxHooksThunkAsync"; import store from "./src/store"; const MyDivider = () => <Divider style={{ backgroundColor: Colors.red900 }} />; export default function() { return ( <SafeAreaView style={{ flex: 1, alignItems: "center", justifyContent: "center" }} > <Provider store={store}> <View> <MyDivider /> <CounterBasic /> <MyDivider /> <CounterRTKwithSliceReactHook /> <MyDivider /> <CounterRTKwithSliceConnect /> <Text style={styles.text}>↑↓</Text> <CounterRTKwithSliceReduxHooks /> <Text style={styles.text}> if ↓ click, it will be applied after 1 sec. </Text> <RTKwithSliceReduxHooksThunkAsync /> <MyDivider /> </View> </Provider> </SafeAreaView> ); } const styles = StyleSheet.create({ text: { textAlign: "center", fontSize: 20, marginVertical: 10, color: Colors.pink100 } }); - Step 4App Test
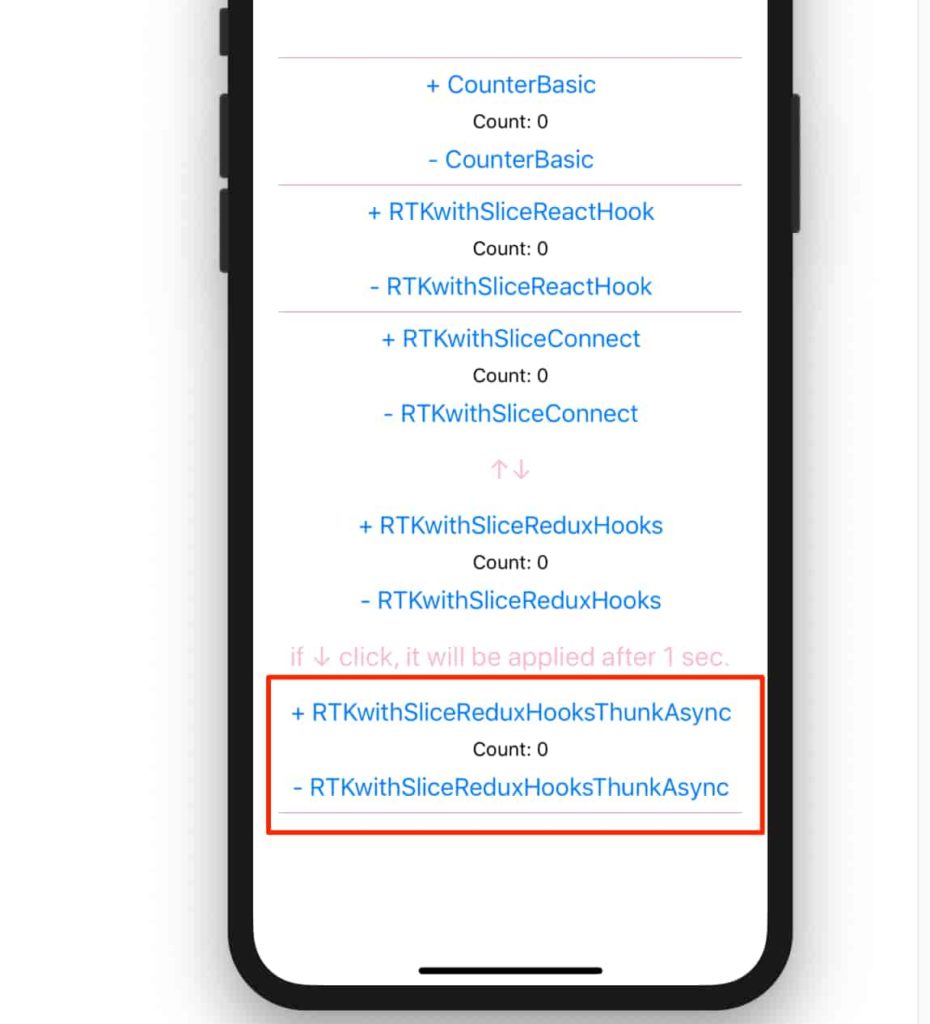
▲ iOS シミュレータ:+ – ボタンをタップすると1秒後に反映されます。
方法 #6:RTK + Redux Hooks + Thunk w/ EmployeeList
※「方法 #6」は この記事 からインサイトを得て RTK 用にコードを変更しています。
また、「方法 #5」の応用方法として、特定のサイトに ネットワークリクエストして従業員の情報を表示してみます。「方法 #5」のStep 1「Redux Store に Middlewareとして thunkを追加する」を設定した状態で進めます。
- Step 1Slice Reducer 関数を作成する
src/modules/pageListsSlice.js
import { createSlice } from "@reduxjs/toolkit"; const pageListsSlice = createSlice({ name: "PageLists", initialState: { pageList: [] }, reducers: { getPageList: (state, action) => { action.payload.data.map(list => { state.pageList.push(list); }); } } }); export const { getPageList } = pageListsSlice.actions; export default pageListsSlice.reducer; - Step 2Redux Store 作成する
作成した
pageReducerを Store に追加します。src/store/index.js
import { combineReducers } from "redux"; import { configureStore } from "@reduxjs/toolkit"; import thunk from "redux-thunk"; import countReducer from "../reducers/countReducer"; import countsReducer from "../modules/countsSlice"; import pageReducer from "../modules/pageListsSlice"; const rootReducer = combineReducers({ count: countReducer, counts: countsReducer, pageList: pageReducer }); const store = configureStore({ reducer: rootReducer, middleware: [thunk] }); export default store; - Step 3非同期で従業員リストを取得するActionを作成する
axiosを利用します。yarn add axiosを実行してインストールしたあと、下記のファイルを作成します。※
axiosやfetchで 普通に API データを取得するには、
例えば、App.jsにuseEffectを利用する関数コンポーネントを作成してデータを取得したりします。import React, { useEffect } from "react"; import { View, Text } from "react-native"; import axios from "axios"; const URLs = { employees: "http://dummy.restapiexample.com/api/v1/employees", fakePosts: "https://jsonplaceholder.typicode.com/posts/1", fakeTodos: "https://jsonplaceholder.typicode.com/todos/2" }; export const App = props => { useEffect(() => { axios.get(URLs.employees).then(response => console.log(response.data)); fetch(URLs.fakeTodos) .then(response => response.json()) .then(json => console.log(json)); }, []); return ( <View> <Text>App</Text> </View> ); };コンソールで確認すると ▼ のようになります。
// employees
Object {
  "data": Array [
    Object {
      "employee_age": "61",
      "employee_name": "Tiger Nixon",
      "employee_salary": "320800",
      "id": "1",
      "profile_image": "",
    },
    Object {
      "employee_age": "63",
      "employee_name": "Garrett Winters",
      "employee_salary": "170750",
      "id": "2",
      "profile_image": "",
    },
    Object {
      "employee_age": "66",
     ...

// fakeTOdos
Object {
  "completed": false,
  "id": 2,
  "title": "quis ut nam facilis et officia qui",
  "userId": 1,
}
一方、
Thunkを利用する際は少し書き方が変わります。
非同期Dispatchを実行する関数を返すAction Creatorを作成 ( 書き方の詳細 ) します。src/actions/getPageListAsync.js
import axios from "axios"; import { getPageList } from "../modules/pageListsSlice"; export const getPageListAsync = () => dispatch => { try { axios.get("http://dummy.restapiexample.com/api/v1/employees").then(res => { dispatch(getPageList(res.data)); }); } catch (err) { console.error(err); } }; - Step 4React Native アプリを Redux Store へコネクトする
実装:関数コンポーネント
useSelectoruseDispatchcreateSliceRedux Thunksrc/modules/PageListWithThunkAsync.js
import React from "react"; import { View, Button, Text } from "react-native"; import { useSelector, useDispatch } from "react-redux"; import { getPageListAsync } from "../actions/getPageListAsync"; export default function PageListWithThunkAsync() { const pageLists = useSelector(state => state.pageList.pageList); const dispatch = useDispatch(); return ( <View> <Button disabled={pageLists.length ? true : false} title="Get Employee" onPress={() => dispatch(getPageListAsync())} /> {pageLists.length ? ( pageLists.map((employee, i) => ( <Text key={i}> {employee.employee_name} / {employee.employee_age} </Text> )) ) : ( <Text style={{ textAlign: "center" }}>Click ↑↑↑</Text> )} </View> ); } - Step 5Redux Store を React Native アプリ ( Root ) へパスする
実装:
configureStorestore<Provider store={sore}> ... </Provider>「方法 #1」の
Step 7でStoreにパス済!PageListWithThunkAsyncコンポーネントを表示させます。App.js
import { SafeAreaView, ScrollView, Text, StyleSheet } from "react-native"; import React from "react"; import { Provider } from "react-redux"; import { Divider, Colors } from "react-native-paper"; import CounterBasic from "./src/components/CounterBasic"; import CounterRTKwithSliceConnect from "./src/modules/CounterRTKwithSliceConnect"; import CounterRTKwithSliceReactHook from "./src/modules/CounterRTKwithSliceReactHook"; import CounterRTKwithSliceReduxHooks from "./src/modules/CounterRTKwithSliceReduxHooks"; import RTKwithSliceReduxHooksThunkAsync from "./src/modules/RTKwithSliceReduxHooksThunkAsync"; import PageListWithThunkAsync from "./src/modules/PageListWithThunkAsync"; import store from "./src/store"; const MyDivider = () => <Divider style={{ backgroundColor: Colors.red900 }} />; export default function() { return ( <SafeAreaView style={{ flex: 1, alignItems: "center", justifyContent: "center" }} > <Provider store={store}> <ScrollView> <MyDivider /> <CounterBasic /> <MyDivider /> <CounterRTKwithSliceReactHook /> <MyDivider /> <CounterRTKwithSliceConnect /> <Text style={styles.text}>↑↓</Text> <CounterRTKwithSliceReduxHooks /> <Text style={styles.text}> if ↓ click, it will be applied after 1 sec. </Text> <RTKwithSliceReduxHooksThunkAsync /> <MyDivider /> <PageListWithThunkAsync /> <MyDivider /> </ScrollView> </Provider> </SafeAreaView> ); } const styles = StyleSheet.create({ text: { textAlign: "center", fontSize: 20, marginVertical: 10, color: Colors.pink100 } }); - Setp 6App Test
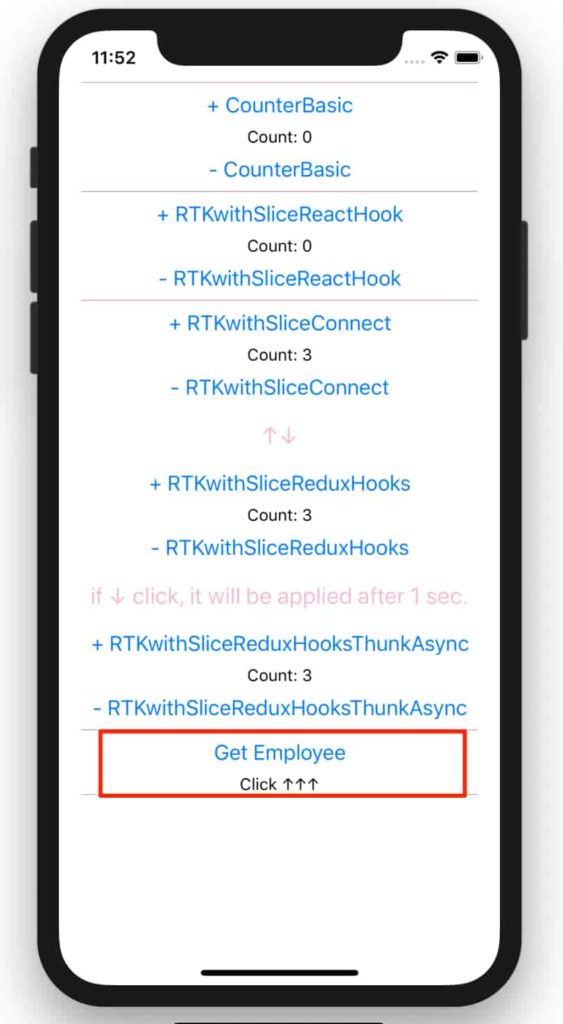
▲ iOS シミュレータ → 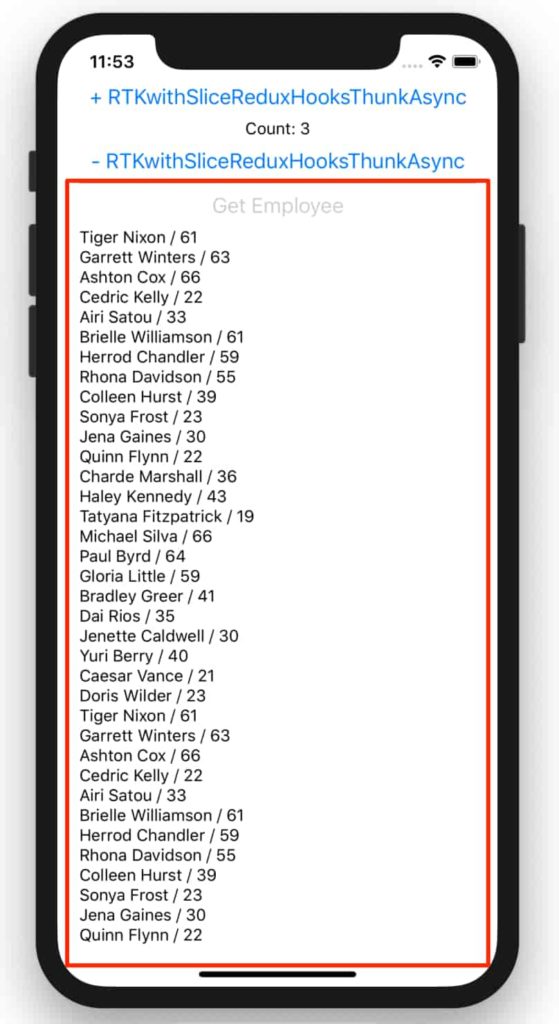
▲ iOS シミュレータ 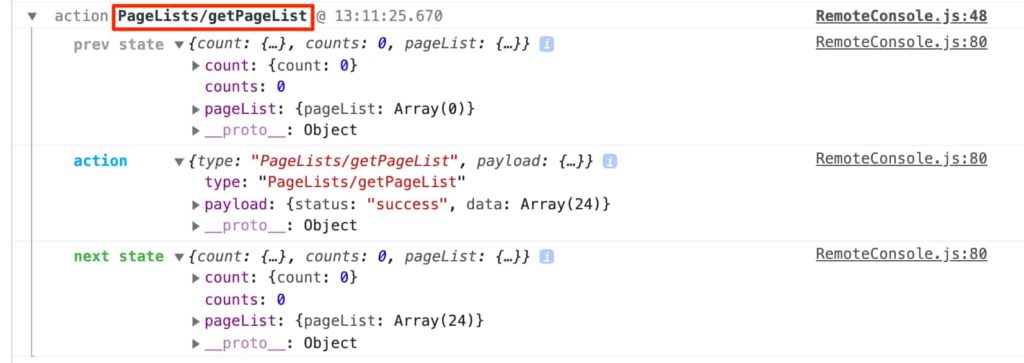
▲ redux-logger
まとめ
※ この記事は このブログ からインサイトを得たものです。
Redux を使うなら、Redux Toolkit は必須で、+ React Hook ( useReducer ) + Thunk の使い方が良いかと思いました。
- 小規模( small ) のアプリ:useState
- 中規模 ( medium ) のアプリ:useState + useReducer + useContext
- 大規模 ( large ) のアプリ:useState + useReducer + Redux
▲ State 管理方法からするとこの記事は 3 番目の複雑で大規模のアプリに実装するケースに当たります。その際に RTK で Redux を実装するのがより楽になると思います。( 全体の Github Repo は ここ から)
※ 以下はこの記事の実践版として、ご参考ください。( 2020/03/06 追記 )
material-bottom-tabsのTabを非表示する方法〜React navigation〜
※ React Context API で State を管理する方法:( 2020/03/16 追記 )
Reduxの代わりにReact Context APIでStateを管理してみる


コメント